Namaste, dear friends! I am still in India, and from here I continue to write my series of articles about the best meditative poses. India never ceases to delight and surprise me with its colors and holidays. Just the other day, the great festival of Janmashtami, the day of the appearance of Lord Krishna, which is widely celebrated throughout India and especially in Holy places, ended. I am in one of these places. This is the town of Udupi, in the state of Karnataka, which is famous for its ancient Krishna temple, founded by Madhavacharya. Today in the article, a detailed description of the technique of performing the Hero pose - Virasana, its benefits and contraindications, as well as a video tutorial for beginners. It is not for nothing that I mentioned Madhavacharya, since legend says that he was an incarnation of Hanuman. And Virasana is sometimes called the Hanuman pose, although traditionally, the Hanuman pose most often means another asana that is not a sitting pose for meditation. So, let's begin:
Execution technique
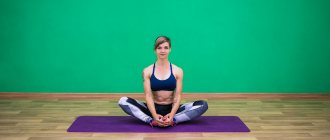
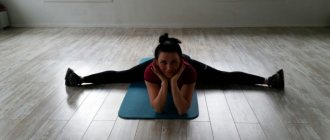
Photo source: instagram @yogavesna
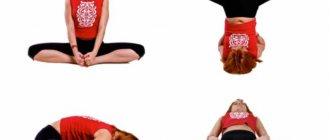
- You need to sit on your knees and squeeze them together.
- Spread your feet apart shoulder width apart.
- Exhale and sit with your buttocks on the floor. The feet are located on the sides of the hips, and the calves are located near the outside. The toes “look” back.
- The back is straight.
- The palms must be placed on the knees so that they look up.
- Make jnana mudra with the fingers of both hands. To do this, connect the tips of the thumb and index fingers, and straighten the rest.
- You can stay in this position for a long period of time if there are no health problems. No need to stress. Breathing is deep.
- You can finish jnana mudra, place your palms on your knees, exhale and interlace your fingers. Next, inhale and extend your arms above your head (the inside of your palms facing up). So freeze for half a minute or one minute with deep breathing. Exhale and lower your hands to the outside of your feet. Bend over and touch your knees with your chin. Stay in this position for about a minute, breathing calmly. Then take a breath, rise and relax.
- When exiting the Hero Pose, you need to raise your pelvis and, leaning on your knees, stand up, straightening your legs.
Related asanas
The hero asana is basic for various breathing practices, including the breathing technique of ujjayi pranayama and breathing of fire bhastrika pranayama. To practice Ujjayi breathing, first assume Hero Pose. Close your eyes and relax. Let your breathing become rhythmic. Imagine that you are breathing through your throat, inhaling and exhaling not through your nostrils, but through the back of your throat. Gently squeeze your throat to create a light snore at the back of it, like a sleeping child.
To practice breathing of fire, first assume hero pose. Close your eyes and relax. Inhale quickly through your nose, as if you were sniffing something. Then immediately exhale just as quickly. Imagine that you are breathing from your stomach. Push your belly out to inhale, pull it in to exhale. Repeat. Practice several sets of ten breaths.
The hero’s asana is also basic for a wide range of mudra practices (chin mudra and jnana mudra, “summoning energy” (prana mudra), “closing the seven gates” (shanmuki mudra), “awareness of inner space” (akashi mudra).
We recommend that you look at the guide to performing the pigeon pose in yoga and the downward-facing dog asana, where you will also learn about their beneficial properties for health.
Special Notes and Recommendations
In Hero Pose, it can be difficult to sit with your buttocks on the floor due to the intense pressure placed on your knees and ankles. To make it easier, you can do the following:
- Roll up a small blanket and place it under your buttocks. This will allow you to properly distribute your body weight. To improve performance, you need to reduce the thickness of the blanket.
- The feet can be placed horizontally if it is not possible to bend them back.
- When it is difficult to straighten the body, you need to rest your palms on your knees and press your groin area down, which will help the torso extend from the base of the pelvis.
- If you experience discomfort in the ankle joints, you can place a blanket under your feet.
- If pain occurs in the knee area, then you need to get out of the position, resting your palms on the floor, and sit on your heels.
Features of Virasana
Asana began to be practiced in ancient times. Books of eastern warriors describe virasana as a mandatory practice before battle. It strengthens the body and spirit, makes you a warrior, gives courage, bravery, courage.
If you practice meditation or sadhana, then the hero's pose will make the practice more complete and complete.
Yogis, Buddhist sages, spiritual seekers perform Virasana every day to make their mind stronger and their will stronger. The asana is considered easy, that is, people without special training can perform it.
Refers to male practices, strengthens male hormones. But many women also practice virasana.
The asana is known in many cultures, so different sources describe different methods and techniques of execution. They differ in complexity, connected by muscle groups. You can choose the appropriate one. Let's look at some techniques.
The benefits of asana in yoga
If you perform this asana correctly and regularly, you can get rid of knee pain, correct the arch of your feet, and even cure flat feet. The pose also has a beneficial effect on the hip muscles, leg joints and shapes posture.
The asana can be done after eating; it can reduce the feeling of heaviness in the stomach.
Additional benefits from regular practice:
- improved digestion;
- combating migraines;
- eliminating tension from the legs;
- help in getting rid of salt heel spurs;
- helping to get rid of gout.
Description of the pose of the hero Virasan
Hero pose in yoga is also called Virasana. This word is taken from Sanskrit. The word asana is translated as “posture”. At first glance, it may seem that this is a simple position that does not require additional concentration or compliance with any subtleties. However, experienced masters will say that the winner’s pose in yoga is considered a rather complex element, which has some tricks and pitfalls. It helps restore psychological calm, relax muscles, and set the mood for doing something.
Variations
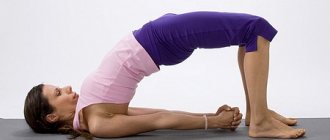
Supta Virasana
Supta Virasana is also called Sleeping Hero Pose. Its practice stretches the muscles of the back, abdomen and waist, improves digestion and has a beneficial effect on the acid balance of the stomach. Blood circulation in the lower extremities also improves, which helps reduce swelling and varicose veins.
Legendary meditation course without payment We recommend! The most popular meditation course for beginners in Russian. More than 100 thousand people have already learned to meditate. Try it yourself. Read more.
Execution algorithm:
1. You need to sit on your knees and clasp the ankles of both legs with your palms.
2. Exhaling, tilt your body back so that your shoulder blades and lower back are on the floor. The elbows and forearms and the back of the head should lie on the floor.
4. After this, extend your arms above your head, palms up, and freeze in this position for 30-60 seconds. If this position is comfortable, then you can lie in it longer with calm breathing.
5. It is important that the shoulders, buttocks and knees lie on the floor, the shoulder blades are pulled inward, and the chest is expanded.
6. To exit the asana, you need to grab your ankles and, leaning on your elbows, raise your head and torso.
7. Next, sit in Hero’s pose.
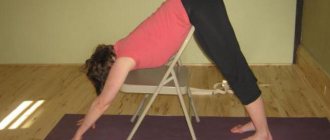
Adkho mukha virasana
This asana is also called downward facing Hero Pose. It stretches the spine and back muscles. It is best to stay in it for at least three minutes.
It is important to stretch the top of your head forward, and fix your pelvis well and not lift it. If the pelvis still comes off the heels, then you can place a blanket under the buttocks.
Guidelines for implementation:
- The starting position is on your knees, with your thumbs touching each other and your knees hip-width apart.
- Next, you need to sit with your buttocks on the floor.
- Your tailbone should rest on your heels. If you can't do this, you can put a block of foam to lean on.
- Next, you need to stretch your torso forward and place your forehead on the floor. Stretch your arms forward with your palms on the floor. There is no need to place your knees too wide.
- Stay in the asana for 1-3 minutes.
If you find an error, please select a piece of text and press Ctrl+Enter.
Advantages
The hero asana changes blood circulation in the abdomen and thighs, which, according to Saraswati, prevents the development of hernia, prevents the formation of deposits, improves digestion, reduces acidity, treats peptic ulcers, reduces cramps during menstruation and helps control sexual desire. Practicing hero pose has many benefits and minimal contraindications. This pose can be practiced by almost everyone, except pregnant women, for whom there is a separate set of yoga asanas for pregnant women. You can meditate in it or learn to breathe correctly.
Since this asana naturally straightens the spine and prevents the development of slouching, it improves posture. The benefit is that you can stay in this position for a long time without back pain. Saraswati calls Hero Pose the “best meditation asana” for people with sciatic nerve pain and can be done along with lower back strengthening exercises at home.
This easy restorative pose relaxes and relieves stress. It involves external rotation of the hips, which relieves muscle tension. When combined with meditation, it has a huge number of benefits: increased concentration, reduced anxiety, strengthened immunity, increased sense of well-being, improved memory, lowered blood pressure and increased life expectancy.
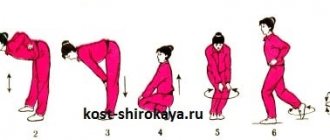
Part three of the complex against varicose veins
Without leaving the birch tree pose, which ends the second part of the complex, do uddiyana bandha - pull your stomach inward and upward, under the ribs. Then mula bandha - draw in the pelvic floor muscles. Stay in this position for as long as you feel comfortable.
The following exercises - uddiyana bandha and mula bandha - are performed in the lying butterfly pose. This is where the complex ends.
Etymology and origin[edit]
The name comes from the Sanskrit word वीर vira
means "hero", and आसन
asana
means "posture" or "place";
supta
(सुप्त) means "reclining". [2] [3]
The name virasana is ancient and is found in the Patanjalayogasastravivarana
8th century (2.46-48) and in
the 13th century
Vasishthasamhita [4] The modern kneeling pose is found in 20th century texts such as Light on Yoga”
by B.K.S. Iyengar; [5] It is also mentioned in Ashtanga Vinyasa Yoga texts (eg Maehle 2011, who recommends it for quadriceps lengthening). [6]
Yoga researcher Mark Singleton notes that a pose similar to Supta Virasana was described in Niels Buch's Danish text Primitive Gymnastics
"at the beginning of the 20th century. Swami Kuvalayananda included Supta Virasana in his system of exercises in the 1920s, from where it was adopted by the influential yoga teacher Tirumalai Krishnamacharya. [7]
Pose adjustment:
- Lift the body up and position it vertically.
- Check that the angle at the left knee is 90 degrees or greater than 90 degrees. Place most of your weight on your right (back) leg.
- Remove the arch in your lower back by twisting your tailbone down and your pubic bone up.
- The lower anterior ribs are hidden inside the abdomen. The shoulder blades are directed towards each other. The top of the head reaches up.
- Pull your belly button in while keeping your abs strong.
- Raise both arms up, stretch your fingers towards the ceiling. Rotate your triceps inward toward the center and your biceps outward. Lower your shoulders and shoulder blades down.
Important: This is a symmetrical asana. Perform the entire sequence of actions on the other side.
Virabhadrasana 3
Initial position:
- Tadasana;
- Adho Mukha Svanasana;
- Utkatasana;
- Virabhadrasana 1;
- Natarajasana (simple);
- Eka Pada Uttanasana;
- Parivritta Ardha Chandrasana.
Pose adjustments:
- balance on one leg;
- straight supporting leg;
- arms extended forward
- to the sides;
- body parallel to the floor;
- the pelvis is closed; extended hind leg parallel to the floor.
Simplifications:
- palms in front of the chest;
- palms to the sides;
- palms back bent knee of the supporting leg.
Edits:
- close the pelvis;
- align the body;
- align the line of the arms and legs;
- if necessary, offer a simplified version.
Myth about Virabhadra
The Sanskrit name of the asana is Virabhadrasana, which translated means “the pose of a good warrior.” And his name, according to legend, was Virabhadra. This powerful, multi-armed gentleman who wields various weapons is the image of Shiva himself. In a fit of rage, he tore out a lock of his hair and threw it on the ground, and thus Virabhadra appeared.
What preceded this? There are several variations of this myth, but it all comes down to one thing. The first wife of Lord Shiva, Sati, came to the festival of sacrifice to her father Daksha. One, he did not invite Shiva. Sati could not bear this humiliation and threw herself into the sacrificial fire. When Shiva learned about the death of his wife, he became furious. From his hair that fell to the ground, Virabhadra rose up and with his army went against Daksha. He punished his disrespectful father by beheading him.
This is the legend. Now, when performing the warrior pose, we can feel all its power and feel the will to achieve the goal.
Warrior pose consists of three parts:
- Virabhadrasana I
- Virabhadrasana II
- Virabhadrasana III
Each of them can be performed separately from each other. But it will be better if during your practice you combine all three parts of the hero pose. But first, let's look at the benefits and harms of these exercises.
show more
Common mistakes:
- Mistake: Putting weight on the inside of the foot.
Do not roll the arch of your front foot inward. Try to lift it up. Press the base of your feet firmly into the floor under your big toes and little toes, as well as the inside and outside of your heel. Spread your toes out to the sides.
- Error: "Sagging Down."
Do not try to move your pelvis as low as possible to the floor. Instead, push off the floor with your feet, defying gravity.
Tip: Don't try to impress your doormat neighbors. They are busy impressing you and not looking around. Remember, Virabhadrasana 1 is not a split.
- Error: Overextension of the lower back.
Avoid excessive arching in the lower back. Tuck your tailbone forward - this will allow you to rebuild your lumbar spine in the correct way.
- Error: Sharp angle in the knee.
Avoid creating a sharp angle with your bent knee: make sure that your knee does not go beyond the line of your big toe. The lower leg and thigh are perpendicular to each other.
- Mistake: Throwing your head back.
Don't throw your head back. Stretch the top of your head up, directing your gaze in front of you.