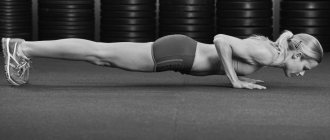
Dips are a popular exercise for those who play sports at an amateur or professional level. It ensures the development of general strength, arm endurance, and helps to work the upper body. For professionals, the appearance and design of sports equipment is clearly regulated, including the width of the bars for push-ups; the standard where all this is indicated is not difficult to find. Based on these data, it is quite possible to make bars for practicing at home yourself.
DIY sports bars
If you decide to make the simulator in question on your own, you should worry about the appropriate materials and tools. Next, we follow the following manipulations:
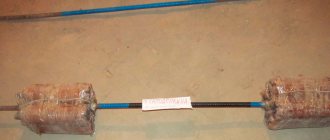
- Take a couple of pipe sections 1700 mm long and four similar pieces of 1500 mm each.
- You will need a couple of metal corners, a drill, and a welding unit.
- The corners are attached using screws, one of them is on the floor, at a height of 1700 millimeters above it.
- Four pipe sections (1.5 meters each) are welded to the corners at a distance of 50 centimeters from each other. The two upper elements and two lower analogues will become a simulator called “uneven bars”.
- All that remains is to connect vertical tubes 1700 mm long at a distance of 1200 mm to each other.
Now the complex exercise machine with parallel bars and horizontal bar can be considered ready for use. Additionally, it is recommended to finalize the aesthetic side of the project and carry out finishing work on your own.
Exercises at home
It is quite possible to make gymnastic bars yourself for home use. If you don’t want to waste time, you can purchase various ready-made variations:
- curved version for floor or wall mounting;
- option with hooks, installed on a wall stool;
- version with support legs, either individually or complete with a horizontal bar mount.
If possible, it is better to buy factory-made gymnastic bars, since their functionality is better and the aesthetics are much more attractive than homemade models. A homemade exercise machine, albeit with ideal parameters, is more profitable, however, first of all, the safety of the exercise should be taken into account. This is especially true for models designed for children and novice athletes. In home workshops, it is not easy to match factory fasteners in terms of material quality and fastening efficiency. Below is a simulator corresponding to the size of the bars for the wall bars.
World champions in parallel bars
- 1954 - Agnes Keleti, Hungary
- 1958 - Larisa Latynina, USSR
- 1962 - Irina Pervushina, USSR
- 1966 - Natalya Kuchinskaya, USSR
- 1970 - Karin Janz, GDR
- 1974 - Anne-Laure Zinke, GDR
- 1978 - Patricia Frederick, USA
- 1979 - Maxi Gnauck, GDR
- 1981 - Maxi Gnauck, GDR
- 1983 - Maxi Gnauck, GDR
- 1985 - Gabriele Fehnrich, GDR
- 1987 - Daniela Silivas, Romania, and Dörte Thümmler, GDR
- 1989 - Fan Di, China
- 1991 - Kim Kwang Seok, DPRK
- 1993 - Shannon Miller, USA
- 1994 - Lu Li, China
- 1995 — Svetlana Khorkina, Russia
- 1997 — Svetlana Khorkina, Russia
- 1999 — Svetlana Khorkina, Russia
- 2001 — Svetlana Khorkina, Russia
- 2003 - Holly Wiese and Chelsea Memmel, both USA
- 2005 - Nastya Liukin, USA
- 2006 - Elisabett Tweddle, UK
- 2007 — Ksenia Semyonova, Russia
- 2009 - Hyo Keshin, China
- 2010 - Elisabette Tweddle, UK
- 2011 — Victoria Komova, Russia
- 2013 — Huang Huidan, China
- 2014 — Yao Ziyi, China
- 2015 - Fan Yilin, China; Victoria Komova, Russia; Daria Spiridonova, Russia; Madison Koshan, USA
- 2017 — Fan Yilin, China
More than 60 push-ups
Street options
It is quite possible to build sports bars for beginner athletes and amateurs in the yard or on a private plot. It will take no more than three days to manufacture the simulator, with a skillful approach and minimal costs.
As the sizes of sports bars “for yourself”, they are guided by the indicators of professional analogues:
- distance between supports - approximately 2500 mm;
- width - 500 mm;
- height above ground - 1700 mm.
To create a simulator, you will need cement, a container, a trowel, a shovel, a welding unit, a construction level, and a 20 cm drill. The crossbars are made from pipes with a diameter of 40 millimeters, and the stands are made from analogues with a cross-section of 60 mm. In the second case, blanks with a rectangular configuration are suitable. The height reserve is taken to be about 600 millimeters.
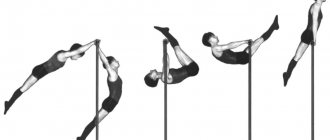
Structural groups of elements
I. Elements performed through the emphasis
The nuances of proper breathing when performing push-ups from the floor
This includes a variety of elements, with the passage of a stop or similar:
- static elements
- angle, high angle, horizontal emphasis, handstand; - swings and turns through handstand, into handstand, from handstand
. - include both various handstand rotations;
- as well as spinners such as “Diomidov” (from a forward swing, a 360-degree turn with the shoulder back into a handstand) and “Hailey” (from a handstand, a 360-degree turn with the shoulder forward into a handstand);
- “wrapping” elements, this is the name given to approaches with a forward swing with a 180 turn into a handstand, and a similar element with a backward swing, where the turn is made under the counter, after which a back swing is performed point-blank;
- somersault elements over the poles point-blank or point-blank;
- circles with two;
II. Elements performed through emphasis on the hands
- forward swing lifts and backward somersaults with various complications (swings, turns and even one-and-a-half back somersaults);
- back swing lifts with various complications (swings, turns, forward somersaults).
III. Elements from a standing position or from a hanging position
- kip-ups and various lifts on one pole longitudinally;
- elements with a large swing from a hanging position - approaches from a hanging point-blank range, elements based on high speeds;
IV. Elements from under the poles
- original and rare elements on one pole longitudinally (turns without touching into a handstand, turns from the corner outside into a handstand);
- arc lifts forward and backward;
- turns back under the poles;
- forward speed at full stop;
V. Dismounts
- dismounts at the initial training level - swinging back and forth from a stop, swinging from a handstand, kicking
(from a handstand, turn around the arm 180 degrees into a dismount); - backflip dismounts;
- forward somersault dismounts;
Note that somersault dismounts can be performed both from a stop and from hanging on both poles. Some dismounts received the status of “forbidden” - these are the original dismounts from hangs and stops on one pole longitudinally.
Recommendations
If you have certain skills, it is quite possible to copy almost any of the industrial analogues. This will require painstaking work on bending, joining and placing pipes and fittings. A big plus is the absence of intermediaries, hired workers and branding, which reduces the cost of the simulator several times, along with its installation.
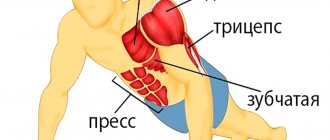
Regardless of the size of the bars, certain safety rules should be followed. Considering that the main load falls on the shoulders, elbows, and chest, these organs are susceptible to injury, especially with insufficient preparation or poor warming up.
Methods for installing a horizontal bar
Technique for performing push-ups on parallel bars, which muscles work during this process
Various installation methods are possible. The choice depends on the layout of the room and the type of horizontal bar.
Before work, you need to develop a diagram - albeit visual, with exact dimensions. This will help you correctly compile a list of materials.
Mounting the product on the wall
If it is necessary to mount it on a wall, choose the most reliable mounts. Experts advise choosing dowels or anchor bolts.
An approximate list of what is needed for work:
- Anchors/dowels, 8-10 millimeters in diameter.
- Building level. Essential for smooth installation.
- Drill.
- Pencil.
Installation instructions are simple.
- Unpack the equipment (if new). Carefully study the package - if it does not correspond to what is listed on the packaging, you have the opportunity to return the product to the store or replace it.
Fastening elements are included in the kit, you should not neglect them. If there are anchors, dowels or hooks in the box, installation is carried out on them.
2. There are holes on the metal for mounting on the wall. You need to measure how far these holes are from each other.
There are large holes through which the main fastening is made, smaller ones for “safety net” and a strong connection with the wall.
3. Mark the locations of the main fastening points on the wall with a pencil. They are leveled.
4. Holes are drilled with a drill. The dowels will require about a centimeter of depth.
Make sure there is no electrical wiring in the "bolt holes" area.
5. The equipment is hung loosely on bolts. After checking the level, visually making sure that the product is seen level, you can finally secure the bolts so that they do not scroll.
How to secure a spacer bar between walls
The spacer bar looks simple - it is not a “sophisticated colossus” with many grips, it is an ordinary crossbar. It is easy to secure it by drilling two holes and driving the pipe deep into the wall. This is rarely liked - there are two damages left on the walls, which will have to be repaired during repairs, and then repeated somewhere in order to install the crossbar again.
To prevent such problems from arising, there is a spacer design. Its disadvantage is that dents remain on the walls. It is easier to level them than to repair serious holes.
Like a molded metal structure, it will fit between walls made of dense material - concrete, brick.
Simply install the spacer structure. The marks are aligned by level, measured from the corners of the walls, and after spacers they are fixed on the marks. Durable, ready for use.
The spacer design cannot boast of endurance - it can withstand only 100 kilograms
It is important to take into account that during sudden movements the mass is felt larger - elementary rules of physics. For somersaults and sports pull-ups, such a device can be used by people weighing 40-80 kilograms
Horizontal bar in the doorway
Spacers are installed in the doorway. The crossbar is installed without additional devices. Experts advise using spacers.
In addition to spacers, there are other structures that can be installed in the doorway. Their installation requires more skills and materials.
List of materials:
- Anchors or dowels.
- Drill.
- Pencil.
- Additional fasteners.
The installation plan is simple:
- Take measurements, make marks with a pencil, drill holes with a drill.
- Additional fasteners are secured, after which the horizontal bar is loosely installed.
- Balance and equidistance from below and above are checked. After confirming the correct installation of the anchor, the dowels are tightened.
- If the horizontal bar consists of several parts that need to be hung on each other, after tightening the bolts, install the remaining parts, grips, etc.
In the doorway
Installation of a horizontal bar with fixation on the ceiling
Mounting on the ceiling is the most successful from the point of view of interior solutions - there is more free space on the wall. This installation is more complicated.
The most reasonable thing is to use anchor bolts. Support at four points. The work plan is similar to wall installation, with no need for leveling.
How safe is it to attach a horizontal bar to the ceiling? This depends on the weight of the equipment, the quality of the bolts, and the correctness of the work. The quality of the ceiling will say a lot. The material from which it is made must be durable. Installation is not carried out on a wooden ceiling.
Ceiling installations are rarely used due to the fear of the structure falling. On a solid ceiling, with proper work (ability to handle anchor bolts), the horizontal bar will withstand 300 kilograms.
Ceiling mount
What distance should be between the bars?
So that you have something to install and you read this article for a reason