Today’s article will talk about probably the most popular equipment among outdoor athletes and those who like to practice on outdoor horizontal bars and uneven bars. Safety straps for the horizontal bar are used by both turnstile men (because any more or less complex rotations need to be done ONLY in the straps), and baristas (studying complex elements of GIMBAR requires insurance), as well as workout athletes and those who train for strength (the straps allow you to turn off from working on the grip and forearms and focus on training the back muscles).It is worth adding that safety straps are the little thing that unites street athletes and training enthusiasts in fitness clubs and gyms, because they are also used in exercises such as deadlifting craving and others.
Why are safety straps needed (video)
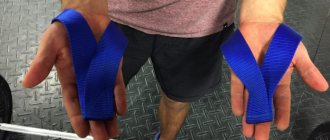
Safety straps (belts) for a horizontal bar are a strip of durable fabric, sewn together. Although safety straps have a huge number of “popular” names, they all mean the same thing. A strong strip of fabric sewn into a circle.
The main task of safety straps, as the name suggests, is to provide insurance for the practitioner while performing elements.
By the way, one of the main differences between safety straps and athletic ones is that the latter, due to their physical structure, DO NOT PROVIDE insurance and can only be used in strength exercises. On the other hand, this is an advantage of athletic straps that when you unclench your hand, it is released and does not remain fixed in the strap.
Deadlift straps, barbell straps, athletic straps
Athletic straps look completely different and are used primarily to compensate for insufficient grip strength and “unload” the forearms and hand. It often happens that when doing, for example, pull-ups on a horizontal bar, your back is not yet tense, but you have to get off because your arms can no longer hold you up. Athletic straps solve this problem. They also solve the grip problem in other exercises, when you need to use a weight that exceeds what you can hold, these are all possible barbell rows (deadlifts, for example) and dumbbells (bent over rows, for example).
Strap material
In those distant times, when yard sports were just emerging, and there were no places like the WORKOUT store where you could buy straps, so many people made them themselves.
Then the material used was everything that was more or less suitable (in terms of strength, thickness and width), starting from backpack straps and ending with tow ropes and kimono belts. Of course, there was no question of any quality at that time, and very often such straps had to be thrown away and looked for new ones.
After the advent of the civilized production of safety straps, a certain process of their standardization began, and today we can distinguish two main materials from which they are sewn. Firstly, it is cotton, and secondly, it is synthetic fibers (like nylon). In terms of basic characteristics, such as strength, width and thickness, these two materials are almost identical. And their main difference is rigidity. Still, cotton straps are softer and therefore (personal opinion) more pleasant to the touch, on the other hand, for this very reason they stretch due to active training. Synthetics are more rigid, but do not stretch and last longer. Well, if you do it with gloves, then the straps don’t matter what material they are made of.
Determining the size
Next, you should decide on the size of the future strap. It depends on several factors:
- The first is the diameter of your brush.
- The second is the diameter of the bar you usually practice on.
Some people like to do exercises on thin horizontal bars, and some on wider ones - this is individual.
Accordingly, you must choose the correct size for your strap.
And you can determine whether a given size suits you or not in one proven way. To do this, wrap your future belt around your wrist three times and then simply cut off the rest. This length should be more than enough for you.
Frame
The frame is the arched underwire that is sewn into the base of the bra cups to give the breasts a rounded shape and to provide support, especially needed in strapless bras. They are made of wide wire, thin plastic or metal plate. The underwires must match your breast size and design requirements. They have the same shape, but differ in length, which is indicated in cm.
Standard
This type of underwire is used for most mid-line bras that do not require exceptional support.
Extended
Underwires of this type are intended for models in which it is important to provide maximum support, for example, there are no straps or they are removable. Typically, long-frame bras have a closed neckline.
Shortened
Underwires of this type are suitable for types of bras such as balconette, plange and angelica, in which the neckline is as open as possible.
Stitching
When cutting materials to size for yourself, do not forget that you will have a connection from one end of the strap to the other, in order to sew them together so that they do not diverge. The straps are a solid circle.
As a rule, after the correct patch, you should have the letter “X” in the square. We hope that you were able to correctly determine the size of the belt you need.
Again, without having yet sewn the two ends together, you can go to your horizontal bar and finally measure the appropriate parameters by clamping the joint with some kind of clothespin or needle.
Sew on the long piece
The short part of the belt is already sewn in place. Now take the long part and stitch it in place in the same way as the short one: first stitch the end of the part to the edge with one seam, retreating 4-5 millimeters, and then turn the part in the opposite direction and stitch again, hiding the end of the belt. Pass the sewn long part through the slots of the slider, first into one, and then into the second so that the slider moves freely along it.
"Dad is offended." Agata Muceniece about her relationship with Priluchny after the divorce
Lost weight: what Sofia Tarasova sacrificed for the sake of “VIA Gra” (new photos)
Why French children behave well: eight ways to raise them
Grips
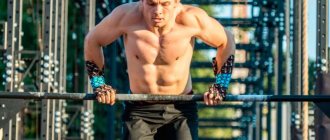
There are different types of grips and you need to be able to use them in straps. How to properly put on the straps with a standard overhand grip? It's simple - you have to throw the strap so that the first part hangs in half and evenly to the other strap. Then you insert your hand into it up to the palm, turn it to the side towards you and grab the horizontal bar.
There is also a second type of grip - an underhand grip. This time your position during the exercise will be reversed. You insert your hand into the strap on the other side and reach away from you.
In addition to the classic types of grip, there are many alternative ones, among which the most widespread is the Colombian. Choose what is convenient for you personally.
Sew on the short belt piece
Let's start sewing the belt to the bag from the short part. Thread it through one of the slots in the slider so that the second slot is covered by this part. Slide the slider along the strap to the middle and fold the piece in half. Tuck the raw ends of the short strap under and, placing it in place on the bag, stitch the piece to the edge. Then turn the strap back and stitch again - the raw ends will be hidden. Here you can use not a simple straight stitch, but, for example, a zigzag or wavy stitch - it will become an additional decorative element of the bag.
Tips and Cautions
It would seem that the strap is your protection. But there is one thing - it can be fraught with several dangers. Because you can't lower your hand when you need it, you can end up in some sticky positions. You can simply be jerked around during any exercise, and any wrong turn can suddenly catch you off guard.
No matter how soft the straps are, they squeeze your wrist and create some friction on them. No matter how sad it is, you can literally wipe your hands bloody. To avoid such cases, the best way is to use special gloves. These should not just be leather or athletic gloves, but gloves, preferably made of wool or fabric material, with a special neck that will protect your wrist from the direct impact of the straps.
There is a belief in some circles that straps greatly weaken your grip, and as a result, your arms will not be able to support your body without a harness. But straps are simply necessary for learning some elements and exercises. They will help you, and progress will be obvious.
As a result, over time you will learn to do the same exercise, but without straps. We hope that you have enough needlework skills to make such a wonderful and important item as straps. Try, train, pump up, constantly work on yourself, and you will definitely succeed!
Those who like to keep themselves in shape are often ready for difficult tricks on the horizontal bar, completely forgetting about safety. To reduce risks, special belts are used, which in this case act as insurance. They have many names: some know them as straps, others as gymnastic loops, others simply call them heathers.
How to quickly learn how to do pull-ups on a pull-up bar with an elastic band for beginners
Every self-respecting man should learn how to do pull-ups on the horizontal bar, but not everyone can do it right away. Now you will see that there is nothing complicated about this. Below is a simple and effective instruction that clearly explains how to quickly learn how to do pull-ups on the horizontal bar. Pull-ups are accessible to anyone, even a beginner can master the technique from scratch if they try.
Pull-up technique
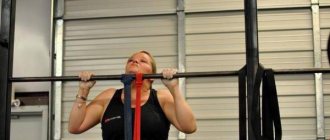
Of course, if you can’t do a single pull-up, immediately throwing yourself on the horizontal bar and trying with all your might to do at least one pull-up is a waste of time. Because you need to start training your arm muscles not with your full weight, but with part of it.
This is achieved using a special rubber called a “rubber Martens bandage”; it can be bought at almost any pharmacy. You need to select a specific type of rubber bandage based on your weight, because different types of this bandage have different degrees of rigidity.
Try to make so many layers of bandage that you can do at least 9-10 pull-ups in one approach. As you might guess, the bandage needs to be secured to the horizontal bar and to yourself.
Note. You can use any rubber, choosing it according to your weight; a rubber bandage is offered as an easily accessible, inexpensive means
With the help of a rubber band, we remove some of the load from the latissimus muscles and gradually increase our strength.
How to do pull-ups with an elastic band
You need to train at least 2 times a week: 3 sets of classic pull-ups (direct grip) with rubber bands and 3 sets of pull-ups with a reverse grip.
Each approach must be done to the maximum, that is, try your best until the last pull-up can no longer be done.
Gradually reduce the number of layers and increase your strength.
When you learn to do at least 1-2 pull-ups without a band, try to increase this number of pull-ups with a regular grip. The main thing is not to give up and set yourself a goal.
Which material to choose?
The easiest way is to buy wrist straps at a sports store, but with the right approach you can make them yourself. Sooner or later, the advisability of using such insurance will become clear, since after a long load the arms may simply not be able to withstand it. In this case, it costs the athlete nothing to fall off the horizontal bar.
Safety straps for the horizontal bar are quite easy to sew with your own hands at home. The main thing is to choose high-quality material that is highly durable. You cannot use a regular belt, much less the handles of a bag. Elastic bandages are also not suitable. It is better to buy a waistband or use a tow rope when sewing. At the time of purchase, you should definitely take into account the strength, since the safety of a person on the horizontal bar depends on it.
You can successfully use a kimono belt, which can easily be purchased at a sporting goods store. Its length is quite enough for two safety belts.
At the same time, it is quite durable and inexpensive for the buyer.
How to determine size?
are several important factors to consider
- brush diameter coverage;
- the diameter of the bar of the horizontal bar on which the exercises are performed.
Horizontal bars are made from metal blanks of different diameters. If we take into account the average size of the strap, it is 64-74 cm. The athlete must determine his optimal size by wrapping the product three times around his wrist. Everything else is cut off.
Material is always purchased with a small reserve. The most reliable would be a two-layer product, since it provides the necessary level of safety.
Relief program
In terms of the strength component, the training program on the horizontal bar for relief is not too different from working on weight. In both cases we train in the medium rep range (8 to 15) and do similar exercises. This is the optimal amount not only for gaining weight, but also for maintaining it.
The main difference between the dialing and cutting modes is nutrition. It is this that determines whether an athlete will build muscle mass or burn excess fat. Also, while drying, you can add cardio in separate workouts: jogging, cycling, etc.
Manufacturing process
The process of creating belts looks quite simple.
- The material is cut to size and then sewn together in a couple of layers.
- Hand stitches are not suitable for this; you must use a sewing machine and strong threads.
- Before use, you should check the products for durability and comfort. They should fit tightly on your hands and not dangle. However, they should not put pressure on your hands.
When using, be sure to take into account the type of grip that the athlete will use.
With a standard overhand grip, the belt is simply bent in half and thrown over the horizontal bar. Both parts should hang evenly. A hand is inserted into the loop, a turn is made and the horizontal bar is grabbed.
With an underhand grip, the opposite happens. The hand is inserted into the belt from the reverse side, the grip is carried out from yourself.
Sew a strap
In the proposed version, the strap is sewn from several layers of ordinary fabric. For a bag, the strap should consist of two parts - long and short. First, measure the inside size of your existing slider. Then multiply the result by two and add 7-10 millimeters per seam. Place the resulting size on the fabric - this is the width of the workpiece. Set aside the required length of the belt and cut out the part. Then draw the second part of the strap: it will be the same in width as the first, but make it 10-11 centimeters long.
Glue both parts with non-woven fabric with an adhesive layer. This will help strengthen the fabric. Now fold both the long and short parts in half lengthwise with the wrong side facing out and, stepping back the required distance from the edge, stitch both parts of the strap. Turn both pieces right side out and iron, straightening the seam. Both parts for the bag strap are ready.
Adviсe
Beginning athletes think that using a safety loop helps one hundred percent avoid injuries. Actually this is not true. Since the hand remains fixed, you can get into a difficult position. It is not so easy to let go of the horizontal bar in such a strap. One wrong turn is enough for a person to be jerked sharply. Because of this, dislocations and even fractures often occur. This is especially dangerous for the shoulder and hand, which bear the main load.
This is one of the reasons why athletes and simply physical education enthusiasts are required to use such insurance wisely and not treat it irresponsibly. The body must be physically prepared.
Although the harness appears to be made of a soft material, it puts quite a lot of pressure on your wrist, creating friction as you move. Because of this, some people wash their hands with blood in the literal sense of the word. Therefore, professional athletes can often see special gloves on their hands. These are not leather or athletic, but made from wool that cover the wrists well.
If you correctly make safety loops with your own hands, you can save a lot and at the same time not fear for your own safety on the horizontal bar. The main thing is to choose the right material and take into account the individual parameters of the wrist, which is important when performing complex tricks.
A master class on making straps for a horizontal bar can be found in the video below.