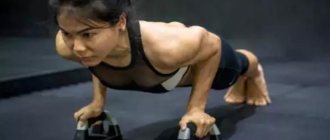
Few people know, but if you don’t know how to do push-ups, then don’t despair, you can make the most of your room. If you couldn’t do push-ups from the floor, try doing push-ups from the wall. Now I’ll just tell you about wall push-ups for girls, how to do push-ups correctly and whether there is any benefit from it at all.
Wall push-ups: benefits for women
If you look at this action from the outside, the thought may creep in that your cuckoo has flown away to warmer climes, but in fact you shouldn’t worry about it. It just so happens that not every girl is so physically developed that she can do push-ups from the floor, knock over a mammoth with her bare hands, and make dumplings for her husband.
But this does not mean that you need to forget about push-ups once and for all and envy those who still know how to do push-ups for the rest of your days.
Push-ups from the wall are just the beginning of the path to the treasured push-ups from the floor.
who can find at least one wall in any room can do wall push-ups Those who are not able to do this should not do push-ups yet, in principle; they don’t need to worry about push-ups.
Gradually, when you tone your pectoral muscles, deltoids and triceps, it will become easier for you and you will be able to smoothly move to a horizontal position and start doing push-ups, for example, from your knees. I have a separate article about these push-ups for women.
Thus, we can conclude that the benefit of wall push-ups for women is that they tone the muscles of the chest and arms , and this in turn visually enlarges the chest a little and lifts it a little.
But the biggest benefit of wall push-ups is that with these push-ups you can learn how to do push-ups from the floor.
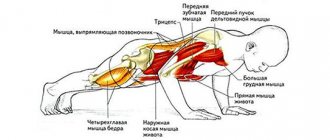
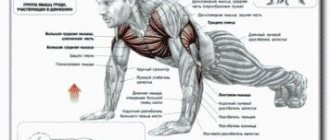
What muscles work?
What are the benefits of wall push-ups and is it true that only women practice them? Let's first find out its anatomy, let's figure out what muscles are involved in the process:
- Back muscles: pectoralis major, teres major, latissimus dorsi, serratus major;
- Abdominal muscles: rectus abdominis, external oblique;
- Arm muscles: triceps (with a narrow position of the arms), triceps of the shoulder.
As you can see, the main focus is on the muscles of the back and abdomen, and it is these muscles that are important to prepare well and warm up well before strength training in the gym. Therefore, wall push-ups for men and women are extremely important during the warm-up phase before the main complex. Yes, they will not help build muscle definition or lose weight, but they will help maintain muscle tone and make them firm and elastic.
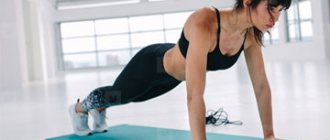
How to do wall push-ups correctly?
In order to start doing wall push-ups correctly, you need, as I wrote above, to find a wall. Then you need to get closer to her. After which you need to stretch your hands to the wall and make friends with it.
When the connection is established, you need to rest your hands firmly on the wall and place your feet at arm's length from the wall.
Then you will need to bend your elbows and spread your elbows to the sides. In this simple way you will correctly perform the first stage of push-ups.
And then the most interesting thing is that you need to get out of the first phase. To do this, you need to straighten your elbows, which you bent just a couple of seconds ago. When your arms are straight, you can begin to be proud of yourself, because you just completed your first push-up from the wall correctly.
Tips for proper form for wall push-ups
The intention to move well will not save you from injury if your technique is not up to par. This is where these tips come in handy.
1.Keep the muscle core tense throughout the exercise cycle
If you feel your thighs scraping all or part of the wall, you are doing the wall push-up incorrectly.
"Saggy, sloppy-looking thighs indicate that the core muscle is not properly tight," says Grayson Wickham, physical therapist and founder of Movement Vault, an online workout site.
For those who don't know, the muscle core is the muscles of the lower back and abdominal muscles. You can pump it up very well with 15 cardio exercises with your own body weight.
Don't know how to tighten your muscle core? Let's look at some steps to make it easier to achieve core voltage:
- Tighten your stomach as if you are about to be punched in the stomach.
- Consider pulling your belly button towards your spine
- Turn your stomach a little to the side
- Imagine that you are about to fit into very skinny jeans.
Squeeze your shoulder blades together
Allowing your upper back to become loose is a surefire recipe for a likely shoulder injury.
Instead, "practice squeezing your shoulder blades slightly back and down, as if you were holding a can between your shoulder blades," says C.J. Hammond, a certified personal trainer with the sports nutrition website RSP Nutrition.
Go as low as possible
"To really get the full benefit of wall push-ups, you need to move through the entire range of motion," says Wickham.
Continue lowering yourself until your forehead or nose almost touches the wall. If you don't have the strength to control your descent further, take a step toward the wall to reduce your distance to move.
Returning to the starting position, push off the wall until your arms are completely straight.
Keep your neck neutral
Once you are in an extended plank position against a wall, you should look straight ahead to keep your neck in a neutral position.
According to Wickham, the risk of "not doing it" is the risk of herniated disc, neck injury and nerve damage.
Don't forget to breathe
In addition to simply keeping you alive, breathing can also help you perform movements correctly.
“Inhale as you lower, then exhale as you push up to return to the starting position for the next rep,” says Wickham.
How often should this be done?
If you want at least your grandchildren to see the results of your labors, then you need to do push-ups more often than once a year.
If you want to learn how to do normal push-ups and tighten the muscles of your chest and arms, do push-ups more often . You can do push-ups every day.
Yes, the muscles definitely need rest and recovery. But, if we are talking only about push-ups, and especially against the wall, then the muscles do not receive such stress to recover for several days.
If you go to the gym at the same time and work out your pectoral muscles and triceps, then you don’t need to do push-ups every day. But I very much doubt that you go to the gym, lift weights there and still do push-ups against the wall.
Benefits of exercise
The main goal of almost any sports exercise is to increase strength, endurance and muscle size.
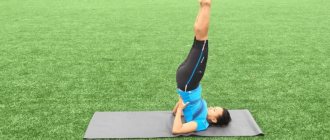
When you perform vertical push-ups, the main load falls on the shoulder muscles, and more specifically, on the middle deltoid muscles. Traps and triceps also work. You can imagine doing overhead presses, but in an inverted position.
Upside down push-ups are beneficial for the following reasons:
- You can conduct intensive shoulder training without additional equipment. The weight you have to lift is your own body. How much do you weigh? Deltas will appreciate this load!
- The biceps and triceps also get a good workout.
- No compression load on the spine. This point is relevant only with the correct technique for performing the exercise and, what is extremely important, completely forgetting about kipping. What kipping is will be discussed below.
- By turning upside down, you give your circulatory system a jolt, which is simply invaluable when working at a sedentary position. Congestion in the pelvic area is prevented and nutrition of the cerebral vessels is improved.
- Due to the weight of the head, a gentle pulling effect is exerted on the neck muscles and vertebrae.
- A sense of balance develops and coordination is trained. The fear of an inverted body position goes away.
In other words, the exercise not only develops the shoulders and arms, but also has a beneficial effect on the cardiovascular system and spine.
When can I expect results?
And of course, everyone is excited when you see the first signs of an athletic physique and ideally shaped breasts, and the fat on your arms stops hanging out, which can be used at sea instead of a screen, so that you can calmly change clothes in the middle of the beach.
I'll tell you this: the result of push-ups against the wall will not be enchanting. You definitely won’t become a goddess in a week. But this will be the first step towards a perfect body.
After you become confident in push-ups from the wall, you can move on to push-ups from the floor from your knees or a wave , where your muscles will receive much more load.
Then you will be able to learn how to do push-ups on the floor with straight legs. Then you will have toned arms, chest and in general you will be great.
But this may take more than one or two months. The main thing here is not to lose enthusiasm. Each time, increase the load, progress, and then the result will not be long in coming.
The first results should be in 3-4 weeks , you should switch from push-ups from the wall to push-ups from the floor, albeit from your knees, but still. Therefore, be patient and strive for success.
Contraindications
You should not attempt handstand push-ups until your muscles are sufficiently prepared for basic push-ups. If you lose control, you could fall on your head, which can cause serious injury.
Also, doing push-ups upside down is contraindicated in the following situations:
- injuries to the hands, elbow and shoulder joints;
- high blood pressure, vascular diseases of the head, eye diseases;
- for girls – pregnancy and menstruation.
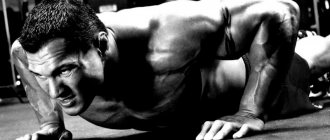
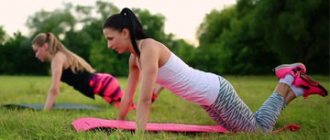
Stomach push-ups
From this position you need to rise to the plank (Photo: www.pexels.com)
With such push-ups, the arms rest for a few seconds and are not overexerted. At the same time, when lifting, the hips and back are involved, which removes some of the load from the arms.
How to do:
- Take a lying position with your arms spread wide.
- Lie with your chest and stomach on the floor. Hands can be lifted off the floor.
- Place your palms on the floor and lift your torso off the floor to a plank position.
Do not jerk yourself up as this may cause injury. Try to smoothly straighten your elbows.
Classic execution
The gym uses two benches of the same length and height. Hands rest on one of them at shoulder width, and legs are placed on the second.
- Initial position. Your back and legs should be straight. The angle between them is approximately 90 degrees. You cannot tilt your head - your eyes look forward. The buttocks are located close to the bench, but do not touch it. Do not bend your knees.
- Lower your pelvis down and bend your arms while inhaling.
- Stop until you feel comfortable. You should not touch the floor with your pelvis or sit on a bench. The goal is to work the muscles, not touch objects.
- As you exhale, return to the starting position.
The movements must be non-stop. Your elbows should be slightly bent in their initial position.
What are the benefits for women?
Like any sports exercise, push-ups have a number of beneficial properties. By performing this action you can get:
- toned stomach;
- elastic breasts (works as a prevention of sagging);
- beautiful hand relief;
- beautiful back.
This exercise is basic and should be included in any workout for women.
Find out the benefits of exercises with an expander for women.
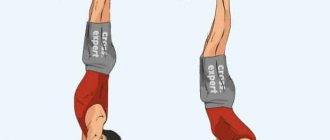
Types of handstand push-ups
It would seem that this is already a technically complex exercise in which there cannot be any variations. However, there are still options that we will consider below:
- Hand push-ups without support. The variation has a high level of complexity, since the legs do not rest on the plane. Those. the position of the body in space is controlled solely by the stabilizer muscles. This variation will require the trainee not only to be in excellent physical shape, but also to have the skills to control his own body. You need very good coordination in order not to fall. Therefore, at first, the help of a partner is required.
- Kipping. In this variation, in the overcoming phase, the legs are involved in the movement, which is a kind of cheating. It looks like this - at the bottom point, the legs bend at the knees and are pulled towards the chest, and during the rise they straighten, creating a moment of inertia. This makes it easier to push the body upward. This technique allows you to perform more repetitions. Popular in CrossFit.
Nuances and safety rules
Despite the relative simplicity of the task, we do not recommend forgetting about some safety rules:
- choose the position in which you feel comfortable;
- do not allow an unnatural deflection in the lower back - the body should form a straight line;
- at the first stage, place your feet shoulder-width apart, this will reduce the load on your lower back;
- in the second and third stages, keep your legs together;
- It is not recommended to fully extend your elbows to avoid injuring your joints;
- straighten your arms as you exhale, and return as you inhale;
- breathing is uniform and movements are smooth.
In the first stages of training, it is not recommended to speed up the pace. After all, their main task is to strengthen muscle fibers. And for this, speed doesn’t really matter.
Scheme for mastering dips on parallel bars
Next, we have prepared for you several training programs and schemes for dips:
| A week | 1 | 2 | 3 | 4 | 5 | 6 | 7 | 8 | 9 | 10 | 11 | 12 |
| Light version | 2*10 | 2*15 | 2*20 | 2*20 | 2*20 | 2*20 | 2*20 | 2*20 | 2*20 | 2*20 | 2*20 | 2*20 |
| Triceps variant | 1*5 | 2*5 | 2*10 | 2*15 | 1*20 | 1*15, 1*20 | 2*20 | 2*20 | 2*20 | 2*20 | ||
| Chest option | 1*5 | 2*5 | 2*10 | 2*15 | 1*15, 1*20 |
Training regimen: 3 times a week, every other day.
- parallel bars - every workout;
- pull-ups – 1 time per week;
- bodyweight squats – once a week;
- push-ups from the floor with various grips - once a week, but no more than 4 sets of 20-25 times.
Sample weekly set:
- Monday: parallel bars, horizontal bar;
- Wednesday: parallel bars, squats;
- Friday: parallel bars, push-ups.
If you want to increase the number of repetitions on dips only, without adding other exercises, do the following 17-week program:
| A week | Approach 1 | Approach 2 | Approach 3 | Approach 4 | Approach 5 | Total |
| 1 | 10 | 5 | 5 | 3 | 2 | 25 |
| 2 | 15 | 15 | 10 | 5 | 5 | 50 |
| 3 | 20 | 20 | 15 | 15 | 10 | 80 |
| 4 | 25 | 25 | 20 | 15 | 10 | 95 |
| 5 | 30 | 30 | 25 | 20 | 15 | 120 |
| 6 | 35 | 30 | 25 | 20 | 15 | 125 |
| 7 | 40 | 35 | 25 | 25 | 15 | 140 |
| 8 | 40 | 40 | 30 | 30 | 20 | 160 |
| 9 | 45 | 40 | 35 | 35 | 25 | 180 |
| 10 | 45 | 45 | 35 | 35 | 25 | 185 |
| 11 | 50 | 45 | 35 | 35 | 30 | 195 |
| 12 | 50 | 50 | 40 | 40 | 35 | 215 |
| 13 | 55 | 50 | 40 | 40 | 35 | 220 |
| 14 | 60 | 55 | 40 | 40 | 35 | 230 |
| 15 | 60 | 60 | 45 | 45 | 40 | 250 |
| 16 | 65 | 60 | 45 | 45 | 40 | 255 |
| 17 | 65 | 65 | 45 | 45 | 40 | 260 |
Typical mistakes of athletes
Back-to-bench triceps push-ups are a technically simple isolation exercise and don't have as many pitfalls as, for example, the close-grip bench press. However, the technical errors described below will prevent you from getting the maximum benefit from this exercise, and if you recognize yourself in any of these points, adjustments to your technique will need to be made immediately. In order to learn how to properly do push-ups from a bench from behind your back, watch a couple of training videos on the Internet or contact a personal trainer at your gym.
There is discomfort - don’t do it
Do not perform the exercise if you feel discomfort in your shoulders or elbows while doing it. Take care of your body (restoring cartilage tissue is a long, expensive and unpleasant process). It is better to replace this exercise with any other isolated exercise that works the triceps, for example, extensions from the upper block.
Hands too wide
Do not place your hands too wide on the bench; the optimal width is slightly wider than shoulder level. By spreading your arms too far to the sides, it will be more difficult for you to control their position. You may unknowingly push them inside, risking injury to your elbow joints and ligaments.
Don't linger in the upper phase
Do not linger too long at the top point with your arms fully extended - there is too much stress on your elbows. It is best to work non-stop, without fully extending your arms at the top point. This will provide the triceps with the greatest blood supply.
Injuries to joints and ligaments
Be especially careful when performing this exercise if you have previously had injuries to your joints and ligaments. Warm up thoroughly, use elastic bands, and perform the movement as smoothly and under control as possible.
Be careful with weights
Don't overdo it with additional weights. If your triceps are already well developed, then the main strength load should be obtained from basic exercises performed with free weights. In this case, leave the bench push-ups for the end of the workout. Such a scheme will help to comprehensively develop the triceps muscle of the shoulder and achieve good relief.
Do not combine with parallel bars
Do not perform push-ups and dips in the same workout. These exercises have almost the same biomechanics, and you risk simply overtraining your muscles.
The support must be solid
Do not perform the exercise on an unstable or soft surface. This way you will be too distracted by the position of your arms and legs, and you will hardly be able to concentrate on working your triceps.
Don't experiment
Do not make unnecessary experiments in your triceps training - all the truly “working” things have already been invented before us. Several times I had to observe the following picture. During push-ups, the athlete leaned on the bench not with his palms, but with his fists, while his elbows “walked” from side to side. It makes no sense to do this, and your hands can be well strengthened with the help of other exercises without resorting to such amateur activities.