Among athletes who engage in strength training, the most popular is the bench press. Thanks to this simulator, you can pump and strengthen muscle groups located in the chest and triceps area. However, not everyone has the opportunity and time to visit the gym, so some craftsmen make this equipment themselves. The design of a do-it-yourself bench press is no different from standard factory-made models. All you need to make it is a small number of tools and materials.
Design modifications
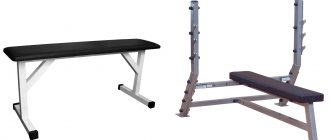
Bench benches are divided into two types: horizontal and adjustable. They differ both visually and functionally. A horizontal bench press with four fixed supports is the simplest basic design. It only implies the user's supine position during training. Such sports equipment is low-functional and is mainly suitable for working the pectoral muscles, as well as the front deltoids.
In a three-post design, two posts are used to mount various equipment and barbell petals. Most often it is equipped with the following sports equipment:
- leg block – designed for performing exercises on the thighs, calves, buttocks, as well as crunches to work the abs;
- additional handrails – will allow you to effectively train your lower abs;
- retractable racks – make it possible to perform exercises with a barbell without additional insurance.
- parallel bars - for push-ups.
These and other devices significantly expand the functionality of the horizontal bench.
Another type of sports equipment for bench presses is an adjustable bench. In it, the lounger (back) can be adjusted in height. The package includes racks with various accessories: brackets, stoppers, clamps. Exercises on such a bench can be carried out both sitting and lying down, using equipment for dumbbells and barbells. With this machine you can perform bench presses at different angles, pumping up many muscle groups. This adjustable bench is most convenient for installation in an apartment and does not require the use of other exercise equipment, as it performs many functions.
A simple horizontal design is quite easy to make. However, if you want to independently supplement such a bench with the devices described above and an adjustable lounger, it will require much more effort and skill.
Horizontal on four fixed supports
With three supports
Adjustable
Useful tips
A bench press will help every athlete conduct successful workouts at home.
To make your classes more productive, there are some useful tips:
- When performing exercises, technique should be given first place. It is better to sacrifice repetitions and approaches, but do everything strictly according to technique.
- When performing a bench press, you should take 4 seconds to lower the load and 1-2 seconds to lift it. In this way, you can not only increase strength indicators, but also noticeably increase muscle volume.
- If you feel unwell, it is better to postpone the workout to the next day. Training should be carried out in a cheerful and healthy state.
- Rest. It is not recommended to train on a bench for abs and presses around the clock. You need to devote 3-4 days a week to training.
There is nothing complicated in making a bench press. The main thing is to apply strength, energy, find the necessary schemes for work and add a little ingenuity.
Varieties
Do-it-yourself bench presses can be made in two versions:
- all-welded construction;
- dismountable with bolts.
Each of them has its own advantages and disadvantages. An all-welded bench is a monoblock that is manufactured by welding parts. Its main advantages are stability and reliability, since the fastening method used will not allow the seams to come apart even under heavy loads. Such a horizontal design is bulky, its installation is impossible in small rooms, which is especially important in a small apartment. Its functionality is also low, since it does not allow the use of additional devices. This power bench is structurally simple, which makes it durable. It is not difficult to make it if you have the skills to work with a welding machine.
A collapsible transforming bench is the best installation option in the house. It is compact and does not take up much space. Its functionality is higher than that of a candy bar. If you add it with an adjustable backrest, you get an inclined bench. This will allow you to perform a variety of exercises on the muscle groups of the legs, arms, shoulders and buttocks, which provides a comprehensive development of the entire muscle mass of the human body. It can be installed and disassembled in a matter of minutes. Assembling a transformer requires skill in using various tools, such as an angle grinder, a drill and others. It is more difficult to manufacture than an all-welded model.
Dismountable with bolts
All-welded construction
Advantages of the simulator
A power bench for home training will be an ideal choice for athletes who want to purchase compact, versatile, not too expensive, but maximally functional sports equipment.
If it is equipped with sliding racks for the barbell, then the athlete has a unique opportunity to work out the entire torso, not only increase muscle mass, but also achieve the creation of a beautiful relief.
Small dimensions allow this exercise machine to be installed even in medium-sized apartments. A convenient and simple assembly mechanism makes it possible not to clutter up the space when the projectile is not in use.
The exercise machine is ideal for both men and women. Properly selected exercises alternated with cardio exercises give the best possible results, strengthen muscles, and contribute to the harmonious development of the figure.
Materials and tools
The main material of the bench frame for a do-it-yourself bench press is a professional pipe measuring 4 x 4 cm. You need to take a profile with walls no thinner than 2 mm. For petal holders under the bar, you need a strip of steel at least 4 cm wide and 5 cm thick.
In order for the frame to withstand heavy weight, the material must be particularly strong.
To assemble the sunbed you will need the following materials:
- steel sheets 2 mm thick;
- polished board;
- foam rubber 2 cm thick;
- durable textiles with water-repellent impregnation or leatherette;
- universal glue.
The fastenings are bolts and nuts, as well as a door hinge that attaches the adjustable lounger to the base. To make a bench you will need the following tools:
- vice;
- knife;
- drill;
- stapler;
- welding machine;
- Bulgarian.
Profiled pipe
Steel sheets
Sanded board
Foam rubber
Upholstery fabric
Tools for work
Measurement of design parameters will be carried out with a tape measure. If you have the skills to work with the above tools, then making a bench press bench with your own hands will not be difficult. In addition to the profile, the frame can be assembled from wooden parts. Materials that will be required to assemble such a structure:
- wooden blocks of three sizes: 2.5 x 5 x 9, 5 x 5 x 25, 10 x 10 x 250 cm;
- plywood panel measuring 30 x 2 x 120 cm;
- bolts and nuts (M5 x 200 mm; M4 x 80 mm; M5 x 300 mm) – 4 pieces;
- nylon washers M5 – 8 pieces, body washers M5 – 14 pieces;
- self-tapping screws 80 mm – 4 pieces;
- rubber pad for racks.
For finishing, you will need impregnation that increases moisture resistance, and varnish for painting the finished bench. To make your homemade structure more durable, you can use glue along with the fasteners. Necessary tools when assembling the product:
- circular apparatus;
- saw or jigsaw;
- chisel;
- spanners;
- drill;
If you choose unsanded wooden blocks, you will need a sanding machine.
Wood is an environmentally friendly material, but not durable enough. In terms of stability, it is significantly inferior to the profile, since it is much lighter. The service life of a structure made of wooden bars is limited, so it would be more advisable to use metal ones - they are more functional.
Wooden blocks
Plywood board
Fastenings
Finishing agents
Assembly tools
Dimensions
The standard bench press dimensions are as follows:
- support length – from 97 to 122 cm;
- the height of the stand in the front of the bench is 83 cm;
- rear stand height – 34 cm;
- width between the front pillars – 52 cm;
- the length of the stands for the front supports is 22 cm, for the rear ones – 30 cm;
- the length of the lounger (in the design of the adjustable bench) in the front part is 94 cm, in the rear part – 16 cm;
- the length of the inclined structure lounger is 20 cm longer than the horizontal one;
- The width of the bench for bench press is from 29 to 32 cm.
The height of the structure above the floor level is determined by the size of the lower arm of the leg lever. To be safe, it is advisable to leave a margin of about 10 centimeters. To choose the optimal length, you need to take into account the athlete’s height.
Dimensions vary based on the area of the room where the exercise machine will be located, as well as the athlete’s build. But for ease of use, making the bench narrower than standard sizes is not recommended. The width of the lounger should not be less than generally accepted standards, since this parameter affects the work of the muscles and, ultimately, the result of the workout.
Basic exercises on the bench
The bench press bench is an excellent home exercise machine on which you can perform a number of exercises every day with or without sports equipment. Here are some examples for training with dumbbells.
Incline Bench Press
By doing the bench press with dumbbells (see Fig. 1), thanks to the wider amplitude and naturalness of the movements, compared to the seated press, you can develop and improve the shape of the chest, shoulder, and triceps muscles.
Pullover with dumbbells
(Fig. 2) The pectoralis major muscle, the long head of the triceps muscle, the teres major muscle and the latissimus dorsi muscle are strengthened.
Dumbbell row
Place one knee on the bench (Fig. H), the other leg is on the floor. Take a dumbbell in one hand and lean on the bench with the other. Tighten your back muscles, then move your elbow as far back as possible to lift the barbell.
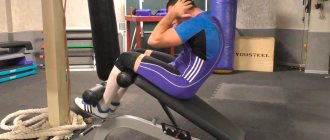
Front bar triceps
Lie down on a bench and place your feet on the floor (Fig. 4) Grasp the bar with a reverse or forward grip, hands shoulder-width apart. Without locking your elbows, bend your forearms to bring the bar down. From this position, straighten your arms, straighten your forearms and lift the bar above your head.
Create a drawing
The manufacture of any bench press model begins with the completion of a drawing. The figure should indicate all the design features of the future simulator and its dimensions. You can find a ready-made scheme on specialized resources, where all the nuances are described in detail. However, in this case, you need to take into account that the proposed dimensions may not coincide with those that are necessary. To achieve the desired result, you simply need to replace the original parameters. If you have experience training on a professional bench press in the gym and performing exercises on it effectively, then you can take the dimensions of this apparatus and make drawings based on them yourself.
Free Bonuses
Included with the Collection you additionally receive 3 e-books completely free of charge.
:
Bonus #1
“Handbook of nutrients and calorie content of food”
(volume 310 Kb).
Nutrient content in basic foods: proteins, fats, carbohydrates, vitamins, minerals, calories.
An indispensable thing when developing individual dietary programs.
Bonus #2
“55 recipes for making cocktails (Iron Cocktail)”
(volume 314 Kb).
The book provides recipes for preparing cocktails, mixtures and drinks for building muscle mass, recovering from workouts, providing the body with the necessary amount of calories, etc.
For strength athletes. E-book with the ability to print recipes.
Bonus #3
“PFT (Power Factor Training) - New Method of Injury-Proof and Fantastically Fast Increase in Mass and Strength”
(volume 359 Kb).
Using the technique developed by John Little, you can lift training weights up to 150% of regular weights without fear of injury. The technique is based on partial repetitions. At the presentation of the PFT system, it was illustrated by the example of a bodybuilder with 15 years of experience. It is generally accepted that after such a long period of training, muscle mass exhausts its potential for growth and adaptation. With the help of PFT, the bodybuilder gained 7.7 kg in weight in a week! Moreover, his bench press figure increased by 22.7 kg in a week! To effectively practice the method, a power frame is required.
Step-by-step production of an inclined bench from profile pipes
In order to independently assemble an inclined sports bench for bench press with three supports at home, you need to prepare the materials and tools described above. Making a bench takes place in two stages: constructing the frame and the deck chair. Before starting work, it is worth practicing the skills in using the necessary tools.
Frame
Algorithm for assembling a metal frame:
- Two 83 cm long sections are cut from the pipe, which will serve as frame racks, as well as support for the rod.
- At a distance of 34 cm from the bottom edge of the rack, a mark is placed that indicates the location of the connection of the elements with the next part.
- The third part of the profile, 52 cm long, is cut off, which will connect the legs, and the fourth part, 34 cm long, is cut for the stand on the opposite side of the bench, at the legs.
- To connect the front and rear legs of the bench, an element 97 cm long is cut off - this will be the support. It is welded to the rear pillar from above, while to the front pillar - from the side. Self-tapping screws can be used to connect parts.
- Specially prepared petals are attached to the profile pipe-racks on top or on the side. They are made from strips of steel that are bent into a "J" shape with a vice. The long side of this part should be 7 cm, and the short side should be 2-3 cm.
- Holes with a diameter of 1 cm are drilled to the crossbar connecting the front pillars. They are necessary for attaching reinforcing rods 30 cm long that regulate the height of the lounger.
In order not to spoil the floor covering by the racks pressing into it, special devices are installed on them - expanders. The connection is also made by welding.
Cut pipes to the required size
Mark the joints of the parts
Cut support
Weld the support to the rear pillar from above, to the front pillar - from the side
Attach prepared petals from steel strips to the posts
Sun lounger
The adjustable workout bench design's bed should consist of two parts that are different in size. Assembly algorithm:
- The short sheet is fixed in the legs, and it should protrude 5-10 cm beyond the end of the stand.
- A long sheet is installed at the head of the bench. It is attached with a door hinge, then welded to the frame and to the base of the lounger.
- Reinforced rods are attached to the underside of a larger steel sheet at a distance of 10 cm from the edge. Their purpose is to raise the lounger to train different types of muscles.
- A sanded board is attached to the steel sheets, the width of which should exceed the size of the first by 5 mm. The connection of two elements is made with self-tapping screws. At the junction of metal sheets, the wooden board should be 1 cm shorter on both sides.
Using universal glue, foam rubber is fixed to the prepared board. It must be pre-measured, leaving 5 cm for allowance. The lounger is covered with thick fabric using a construction stapler.
Cut corners and drill holes to attach the board
Weld the fasteners to the support in three places
Install the sunbed using self-tapping screws
Connections
The parts of the bench frame for the home are connected by welding. Small parts are attached using bolts and nuts. The joints between wood and metal are also fixed with self-tapping screws, which should not come out of the structure. Welding work to connect parts must be carried out with special care so that the seams do not come apart under high loads and vibrations.
Attach the seat to a metal piece
Install the backrest and lounger
Screw on the adjustment foot
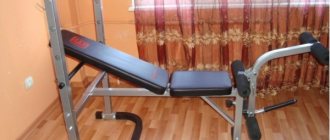
Finished bench
Improved bench model
The bench can be improved - for example, by adding bars to it. This will provide an opportunity to additionally load the muscles of the chest and triceps.
Materials and tools
In order to install parallel bars onto an existing bench press, you don’t need a lot of tools.
The following materials are needed:
- bars;
- welding machine.
That's all. Installing beams is not as difficult as it seems at first glance.
Assembly work
It will take 20-30 minutes to weld the bars to the bench press.
Necessary:
- Get a welding machine and a special mask to protect your eyes.
- Weld the beams to the bench.
The improved bench model is ready. Now there is an opportunity to diversify your home workouts.
How to make simple equipment from wood
The algorithm for making a simple two-support bench structure made of wood is as follows:
- Grooves are cut out in the longest beam that will serve as the base, and the racks are secured in them using fasteners and glue.
- Short bars are attached to the bottom of the posts. Grooves are also cut out in the expanders, and racks are inserted into them. These details will give the structure stability.
- Smaller diameter bars are attached to the side of the main crossbar to form the necessary parts responsible for adjusting the lifting height. Nylon washers are used at the junction of the base and moving elements, which will avoid abrasion of the wood during operation of the bench.
- The plywood sheet, which will serve as a sunbed, is mounted on the moving parts, and is also attached to the support using a door hinge.
- Narrow grooves are cut out on the base. A bolt-nut will subsequently be inserted into them to adjust the lifting height of the lounger.
- For the legs, a smaller plywood sheet is mounted at the end of the bench.
- An inclined bench for bench press made of wood is coated with a composition that increases moisture resistance and varnish.
When manufacturing, the classic standard for the size of such products should be taken as a basis.
Designing a bench press bench with your own hands is not at all difficult. You don't have to be a jack of all trades to do this. Armed with the right tools, the right blueprint, and patience, anyone can make this kind of versatile training equipment. Moreover, once a simple model is assembled, it can be modified at your own discretion. The result is functional and durable sports equipment.
Drawing
Cut grooves in the longest timber
Install the crossbar onto the supports
Attach bars of smaller diameter to the side of the main crossbar
Install nylon washers at the junction of the base and moving elements
Use the bolt-nut to adjust the lifting height of the lounger
Ready-made design without a sunbed
Attach plywood sheet to moving parts
Cut narrow grooves on the base
Cover with stain and varnish
Finished design
Signaling
At competitions, a light signaling system must be installed, with the help of which judges can communicate their decisions. Light signaling similar to that used in weightlifting may be used. When the referee sees a violation of the rules, he turns on his remote control. If a majority of the judges turn on the remote control, an audible signal will sound to inform the athlete that their attempt has failed. In this case, the athlete does not need to complete this set.
Each referee controls the white and red lights. These two lights mean “good lift” and “no lift” respectively. Light signaling lamps are positioned horizontally in accordance with the position of the three judges. The light signaling must be arranged so that the bulbs light up simultaneously, and not separately, as the judges turn them on.
In case of need, for example in case of breakdown of the electrical alarm, the referees must have flags or banners in white and red with which they can indicate their decision after the command in the voice of the chief referee “flags”.
After the alarm goes off and the lights are illuminated, the judge(s) who did not count the weight lifted must raise the appropriate card (plate) indicating the reasons for the unsuccessful approach.